Visualization with PyMOL
- Raja Karmakar

- Oct 19, 2024
- 5 min read
In this article, we will review the basics of getting started with PyMOL 3: creating, saving, and opening PyMOL sessions, importing structures, and exploring basic controls.
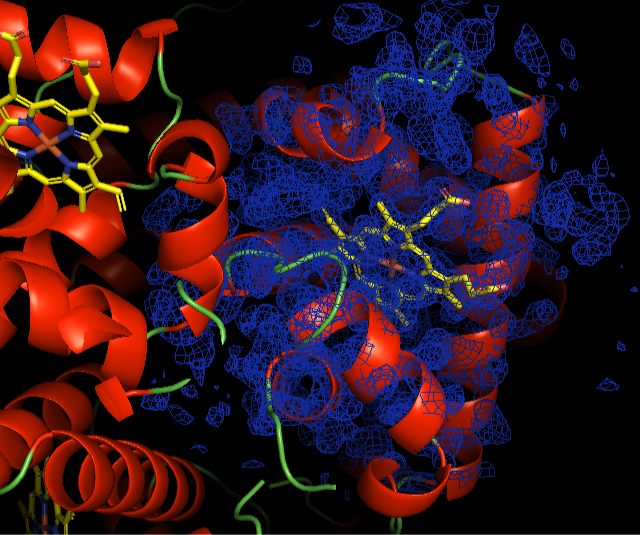
Fig. Electron density of HEM in Hemoglobin for oxygen transport
Overview
Open PyMOL and set your Working Directory
Use PyMOL to download or import structural files
Understand the Contents Panel and use various mouse and toolbar controls, and
Save PyMOL session files and open existing sessions
Opening PyMOL and Setting up a Working Directory
Open PyMOL 3. Please see the “Installation and licensing” guidance on pymol.org. If you have multiple versions of PyMOL installed like I do, open PyMOL 3! If you’re unsure which version you’re using you can come up to the PyMOL menu in the top left, and click “About PyMOL” to see the version number.
Before we bring in any structures, let’s start by setting the working directory. Go to File and choose: Working Directory then Change, and click Open.
You can use the command line interface to replicate the previous steps, by entering the following arguments into the Command Input Area in PyMOL.
Get your PyMOL version.
get_versionPrint working directory
pwdList the contents of your working directory
lsSet your working directory
cd ~$USER/PyMOL3-course-dataDownloading a Protein Data Bank file
Next, we’re going to download a file from the Protein Data Bank or PDB.
You can learn more about the PDB at RCSB.org. Setting a working directory before downloading any PDB files means that any structures we fetch will be saved to our working directory.
Go to the "File" and choose "Get PDB". Next to "PDB ID" type 1buw.
Click "Download". Great! We can see a wonderful Hemoglobin structure, that has appeared in the Workspace, and some information about the structure - the PDB entry title - is printed in the Command Log below the Workspace area.
You can also use PyMOL’s Command Input Area, and we will "fetch" a structure using this method later. Remember fetch requires a direct connection to the internet and thus may not work behind certain types of network firewalls.
fetch 1buwYou can also get multiple structures at once using the fetch command
fetch 1cag 4dkl 1buw 3a3y 6j5t 4v6mThe Contents Panel
On the right-hand side of the PyMOL interface, we can see that our PDB has been added to the Contents Panel. The objects that PyMOL renders in 3D are loaded from coordinate files that describe the locations of individual atoms in the molecule. PyMOL can display a large number of objects at a time, and we can use the Contents Panel to adjust viewing modes, colours, labels, and just about anything else relating to objects.
If you click on the 1buw tile name you can see that we can toggle between it being included or excluded in the Workspace. The “All” object controls everything in the Contents Panel, so we can use this to adjust global settings or include and exclude everything.
Next to each entry in the Contents Panel is a set of buttons. The letters here stand for "Action", "Show", "Hide", "Label", and "Color", and you may hear these buttons referred to as the A-S-H-L-C Submenus.

Fig; electron density of HEM ligand in Hemoglobin protein structure: 1buw
We’ll be covering a lot of these commands in this blog, but feel free to explore and play around with some of the options to get a feel for things!
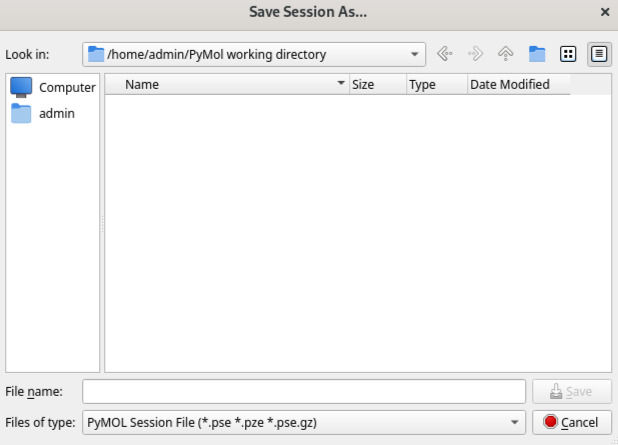
Saving a PyMOL Session
Before we go any further, let’s come up to File and choose "Save Session As". You will see that the default save location is the Working Directory we selected earlier and that the PDB file we fetched has been downloaded to this location as a ".cif file". Let’s call this session "PDB_test", and click "Save". The session name (with the default .pse extension) is now reflected in the System Toolbar.
It is worth noting that PyMOL does not automatically save things, so you will need to remember to save work manually as you go along, using File > Save session, or by typing ctrl/cmd + S depending on your operating system.
Let’s load in another structure and then save this session again. In the Command Input Area type “fetch 6pv7”. This large funnel-shaped structure is a nicotinic acetylcholine receptor with two nicotine molecules bound.
We can see that our 1buw Hb structure is now nowhere to be seen, so let’s use the "Zoom" and "Orient" buttons to fit everything into the Workspace.
If desired, we can toggle off or exclude the 6pv7 structure so it is greyed out in the Contents Panel and do "Zoom" then "Visible" to fill the Workspace with just the 1buw structure again and reset the centre of rotation to only the visible object.
Save the session using the "CTRL/CMD + S” keyboard command or come up to File and choose Save Session. You can see that the session has been saved successfully and the location it has been saved to in the Command Log.
Or you can save your session using the command panel in PyMOL.
save PDB_test.pseDeleting Objects
There may be times when we import a structure by mistake or simply want to delete something. We can click on the Action Submenu next to an entry that we don’t want to keep, and choose “Delete object”. This removes the entry from the Contents Panel so it is no longer available within this PyMOL session.
Or, if you want to use the command panel to perform this action, you can simply type:
# delete {pdb ID}
delete 1buw
Opening Locally Saved Files
We can also easily load files into PyMOL, and there is no need to re-fetch anything that has already been downloaded from the protein data bank even if we have deleted it from a PyMOL session.
Let’s try this now, by coming up to "File", "Open" and "Choose" the 1buw.cif file. This is the original file from the PDB that we fetched - it is still here in our working directory even though we deleted the object from our PyMOL session. It has now been loaded back into our PDB_test PyMOL session, and we can see it in the Contents Panel.
Load an existing file into PyMOL
load 1buw.cifOpening a PyMOL Session File
As well as loading in structures from the "File" > "Open" menu, we can also load in session files. Let’s load in the pre-generated PyMOL session file called PBD_test.pse from the saved data directory. I’m going to load it as a new session, but you can also merge sessions in PyMOL, which can be handy if you have different structures and objects saved in different sessions that you want to bring into the same PyMOL session. You can additionally open PyMOL sessions in new windows and have multiple PyMOL sessions running at once. Toggle the All tile in the Contents Panel to include all structures, then click "Zoom" > "All", followed by the Orient Button.
Open an existing PyMOL session
load PDB_test.pseFor more information on the PyMOL command line interface, you can check the details by clicking here.

We hope this article really fulfils your needs and have a great scientific career ahead.
In seeking professional research assistance, consider Kapsid Simulations, a prominent emerging company dedicated to streamlining and cost-effectively facilitating the research process. Our team is readily available to assist you; simply send an email to info@kapsid.com